extended camera settings
We have looked at the fundamentals of photography, now we will look at some of the other camera settings that will be useful to know.
Image Quality
When you take a photo it is stored on your SD card inside your camera and there are currently several file formats you can use, these are RAW, JPEG, or RAW+JPEG.
RAW format files hold unprocessed sensor data and are much larger than JPEG so they will take up more space on the SD Card than a JPEG, however, RAW offers better image quality and can be imported into photo editing software to be post-processed. Post-processing can save an image that is over or underexposed, also it can be greatly enhanced by changing any of the settings from the editing software, so shooting in RAW is highly advised.
JPEG format is much smaller than RAW file format due to being compressed and is useful if you don’t have much space on your SD card, or if you are in a rush to upload the photo onto the internet. The downside is that if you do not get the right exposure, or you wish to enhance your photo in software it can’t be done as effectively as it can with RAW files.
RAW+JPEG will take an image of each file format to covers both requirements, however, this will be at the expense of taking up more space on the SD Card and also the camera’s technical capability to buffer these photos during bursts and to be ready to take more photos.
White Balance
The white balance setting is used to adjust the photo temperature in changing light conditions, this is because light sources possess different colour temperatures which are measured in Kelvin. When adjusting this setting you can make the photo look colder or warmer, appearing bluer or more orange. Auto White Balance can detect which setting is required, but with all auto settings on the camera, they can be wrong sometimes.
The examples below are shot indoors at room temperature with light coming through a window, no artificial light or flash was used. No settings were changed for each individual shot, therefore you can see how each white balance setting tries to compensate for too much or too little light.
All Images shot at 40 mm f / 2.8 at 1/80 and ISO 100

Shade - 8100 K

Cloudy - 6150 K

Daylight - 5250 K

Kelvin - 5050 K

Fluorescent - 4050 K

Tungsten - 2950 K

Auto - 5550 K

Flash - 6850 K (Flash did not Activate)
Shade - The ‘shade’ setting makes the image warmer in an attempt to offset what should be a lack of daylight in the image, however, due to the light coming in through the window and the warmth from the shade setting it has given the overall shot a much warmer appearance. If this was shot outside in the shade then the image would have been correct
Daylight - The ‘daylight’ setting assumes the photo is being taken outside on a cloudless day with plenty of sunlight. With sufficient daylight coming through the window this photo is quite accurate. The table is white, and the colours of our quite stunning Smurf model are accurate.
Fluorescent/Tungsten - The ‘fluorescent’ and ‘tungsten’ settings cool down the temperature of the image to compensate for what should be bright artificial lights during the photo. As the photo was taken in daylight conditions it shows just how much cooler the camera makes the overall appearance.
Practical use of the white balance settings:
You now know from the examples above, that white balance changes the feeling of warmth and cold of the overall image. Let us apply a few of these settings in a scenario.
During a Sunrise/Sunset there can be many colours and tones that can be seen visually, which can be quite difficult to portray accurately on a photo because some cameras do not have the full dynamic range of colours. Most people I know will just use Auto or Daylight setting for Sunsets/Sunrises but if you were to try the ‘shade’ or ‘cloudy’ setting it can bring out more tones in the image and will make it look warmer and more vibrant. Try changing the white balance to find the effect you want during Sunrises/Sunsets and you will be surprised by the difference it can make.
Depth Of Field Preview
Have you ever wondered what your photo would be like whilst you are looking through your viewfinder? Well, wonder no more.
Most DSLR cameras have a preview button that when pressed will allow you to see the effects your current settings are having on the scene you are framing in your viewfinder. This is very useful for making slight adjustments to your exposure, white balance, depth of field and even achieving the desired bokeh effect before clicking the shutter release.
Format SD Card
On most DSLR cameras you will see a bin icon or similar on the camera body that will enable you to delete the images individually. If you wish to delete them all quickly them go into your camera settings and select format memory card. I will use my Wildlife camera the Nikon D500 as an example :
On-Camera Body - Menu > Setup Menu (wrench icon) > Format memory card
Select which card by scrolling then select the Yes and OK button.
This will delete all images from the SD Card I chose. This of course may differ from make and model but a quick search on Google or the Manual will give you the settings.
Exposure Compensation
On the camera body, there should be a button with a + and - on it. This is the exposure compensation button.
After selecting the white balance, metering mode, shutter speed, aperture, focal length, and ISO, and you have your exposure meter dead center, you notice the exposure isn’t quite how you want it. Do you need to re-adjust all the settings again? Not quite. Rather than messing around with all the individual settings such as shutter speed, aperture, etc.. you can simply use the exposure compensation button and dial the exposure to - or + to achieve your desired effect. This really is handy for quick adjustments on the fly, or for difficult situations such as snowy or dark photos.
Auto Focus Lock (AF-ON) / Back Button Focus
You have learned that half-pressing your shutter-release button will focus your image in the viewfinder, now what if I told you that there is another button you can use instead, and why would you want to change?
On some DSLRs, there is an AF-ON button that can be configured in the camera settings to take over the focus from the shutter-release button as a priority. This has several benefits which I will explain.
It helps to separate the focus and the shutter release button from one another, this removes accidental photos when too much pressure is being applied on the shutter release button whilst focusing. This can be fairly common with erratic subjects because they can require a lot of half-pressing on the shutter release to maintain focus. Over the course of a day, this can add up, cause missed opportunities, and can be somewhat tiring to the finger.
Also, on a stationary subject, once you achieve focus when using the AF-On button you can simply depress the AF-On button (this disables any further focusing), set your composition, and take your photo by pressing the shutter release button, the focus remains throughout and you can re-compose again and snap away! What if the subject started to act erratic and was running/flying around very quickly? All you need to do is hold down the AF-On button to maintain the focus of the moving subject whilst pressing the shutter release button to photograph it, simple!
Mirror Lock-up
When the shutter-release button is pressed, it will open the shutter door, and the mirror will flip up to allow light onto the sensor which will register this light to render the image. During the process of the shutter door and mirror flipping up, vibrations can be caused and these are sometimes noticeable as a lack of sharpness or blurred image. This can be noticeable when using a poor tripod or whilst hand-holding. One way to minimize the vibration is to set the camera to mirror-up mode so the only internal mechanism functioning will be the shutter door which will help to improve image sharpness.
Long Exposure Noise Reduction
Digital cameras will develop hot or stuck pixels that can be seen when you magnify an image in photo imaging software. These hot/stuck pixels display as red or green dots in images and can be removed during post-processing quite easily. These will become more noticeable the longer the exposure you use, therefore using a long exposure noise reduction setting is advised. When you take a photo with long exposure noise reduction it also takes a second photo known as a dark frame that consists of image noise and hot/stuck pixels. The camera then subtracts the noise and hot/stuck pixels it sees in the dark frame from the light frame (main photo) to give you a clean image.
So what is the drawback? Long exposure noise reduction takes twice as long to produce an image due to the noise reduction, therefore if you are in a rush it may not be for you, also you may miss something happening because your camera is locked up performing long exposure noise reduction. I tend to only use this for Astro-photography or when I have a second camera on me.
High ISO Noise Reduction
Digital cameras have a setting known as high ISO noise reduction and although it applies high ISO it can also be used for low ISO. I personally would not apply this to low ISO settings, if you can control this in the camera settings because photos under ISO 800 shouldn’t require that much ISO reduction. On lower-end cameras, the setting may be required on ISO 800 upwards, whereby on higher-end cameras you may not need this until ISO 3200. You would need to test this setting on your camera and compare images to assess what is best for your model.
Auto Exposure Bracketing (AEB)
Generally speaking, Auto Exposure Bracketing (AEB) is a setting that enables you to capture multiple images one after another with varying exposure levels. Bracketing can also be used to capture images with other varying settings such as aperture, focus, white balance, and so forth, however, we will just focus on AEB for an understanding of the bracketings function.
So what does AEB actually do? I will give you an example of what happens on my Nikon D500, and then I will show examples of the results from images.
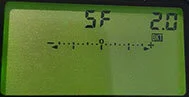
On my Nikon D500, the Bracketing button is on the front left side of the camera as a small button shown as BKT. When I hold down the button you will notice from the images below that the display on the top of the camera will change to show the number of photos selected to be taken (5F). Also, there is a meter that shows - and + markers for exposure at each end. In between the exposure markers, there are stop indicators, and this can also be seen as a number in the top right. These exposure markers can be adjusted to vary how dark and light the exposure stop in between each photo. By using the front dial on my camera I can adjust the exposure stop values, whereas the dial on the back of my camera adjusts the number of photos to be taken.

5F depicts the number of photos to be taken, and the 1.0 will be how many exposure stops between each photo. There will be a small exposure difference on each photo.
Again 5 photos to be taken, however, this time there are to be 2 stops between each photo. There is an example of how this looks below.

5 Photos again, but this time the exposure stop difference will be 3. This will create very dark and very light photos.
The Nikon D500 can take 3, 5, 7, or 9 bracketed images, and for the example below, I have chosen 5 images at 2 stops difference per photo. When you press the Shutter release you will need to hold it down until the Photos have been taken. This will take the first image at the exposure you have set, then it will proceed to take the next 4 photos at the exposure stop levels you chose. The result below is 1 normal exposure, 2 over-exposed images at +2 stops and +4 stops, and 2 under-exposed images at -2 stops and -4 stops.

Why would you want to use AEB?
One reason is during tricky weather. If you are trying to capture a beautiful landscape, but the weather conditions are constantly changing, using AEB will be useful. By using AEB it will take a quick burst of photos at varying degrees of exposure, this will greatly increase your chances of capturing a well-exposed photo during times where the exposure is constantly changing.
Another reason for using AEB can be when the subject of interest has very high contrast and using AEB will help with creating a final image that will be much more acceptable. If you take one photo the result would be way too over or under-exposed and there would be very little chance of salvaging the photo in post edit software, but with AEB you can combine these images into one to help negate the high contrast. This leads us to image merging/High Dynamic Range (HDR).
Image merging and HDR are produced from AEB photos which are merged in post-editing software such as Photoshop, Lightroom, and any other post-editing software. AEB images can be very handy when a subject/objects have very high contrast, these can be impossible to photograph without being too bright or dark. By merging the images together, will help to produce an image that is correctly exposed. HDR is high-level contrast photos that contain very high levels of light and dark detail in an image. Generally, an image that contains black shadows has no viewable details within, however, with HDR, due to the images being merged the detail within very bright and dark areas can sometimes be seen. It achieves this by using all the images and combines them to create an image that displays the full tonal range, meaning it displays all the highest and lowest tones from all images into one.
Drawbacks of AEB
The main drawback of AEB is the amount of extra space required by taking many photos in sequence, so be mindful of your SD Card(s) capacity.
If your main purpose for using AEB is to create HDR and edit them with post-editing software, then the time required for merging and creating the final image can be quite time-consuming, although the results can be well worth the effort.
AE Lock (Locking The Exposure)
AE Lock is used on the following modes:
Aperture priority mode
Shutter Priority mode
Program Mode
If you are using manual mode it will not need an AE lock due to you having full control of all settings.
To use AE Lock simply point the focal point at the subject and hold the AE Lock (AE-L on back of Nikon or Asterix on Canon), once you release the AE Lock button it locks the exposure. If you wish to recompose the photo simply point the focal point at the subject and whilst holding down the AE-L button obtain the composition you wish for the photo, you can then release the AE-L to lock in the exposure to take the photo. If you were to hold the AE-L and change your distance to the subject it would still remember the exposure so it is very handy for moving around a scene to take photos at different angles.
Try to remember that AE Lock is generally only worth using for Spot metering. If used on Matrix metering, or evaluate metering, you would be exposed for the whole scene whereas Spot metering is for the center focus area of the focal point.
Interval shooting and Time-lapse
Time-Lapse Photography
Time-Lapse Photography is a technique of capturing photos, with preset intervals, that allow video frame rates at a more spread-out frequency than that of the viewing sequence. Due to the preset intervals of the photos, when played back at normal speed, the speed is much faster giving the appearance of a time-lapse. If an image of a Sunset is captured at 1 frame per second and is then played back at 30 frames per second it will give the appearance of time moving faster x30. This is especially noticeable when capturing a Sunset or the movement of clouds. It is particularly useful using processes that take a lot of time, for example, flowers blooming, construction of buildings, motorway traffic, or even the changing seasons.
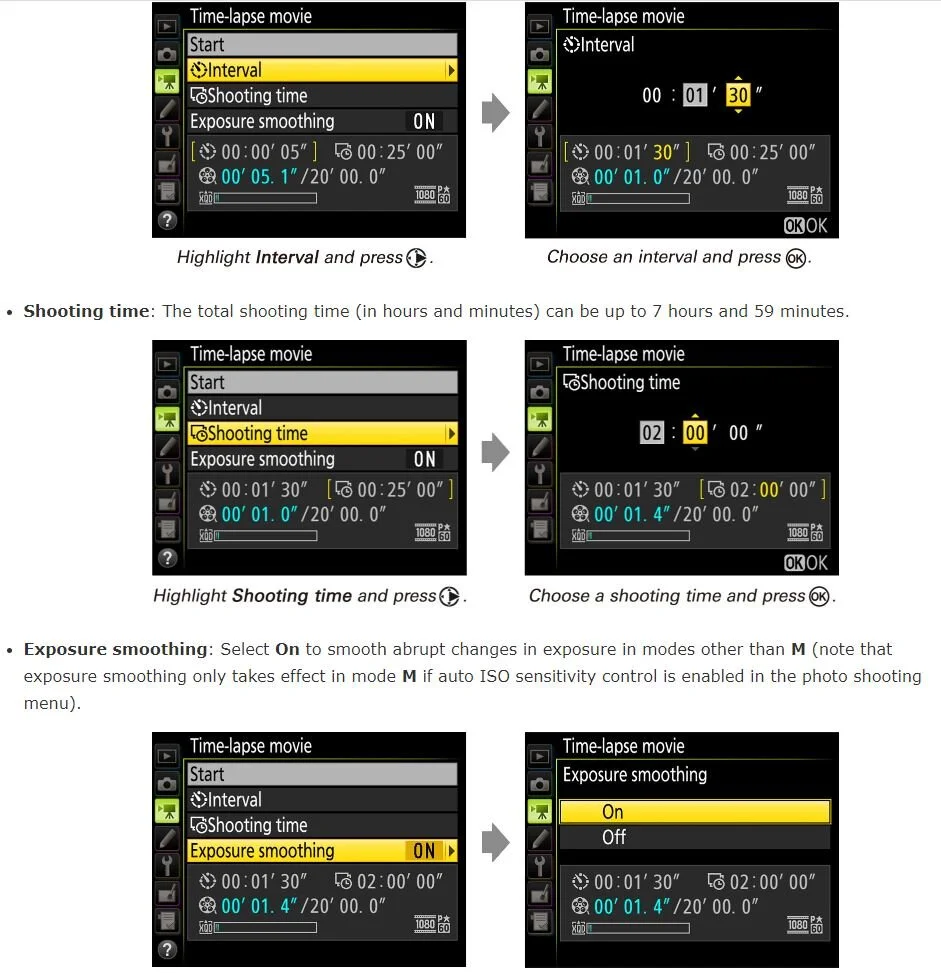
Interval-Timer Photography (as explained by Nikon)
In interval-timer photography, the camera takes photos at preset intervals. Image quality, size, and other settings can be adjusted for exactly the results you want, while shots containing unwanted objects can be edited or deleted. You can create frames for high-quality movies and even (in NEF/RAW format) choose the color temperature.
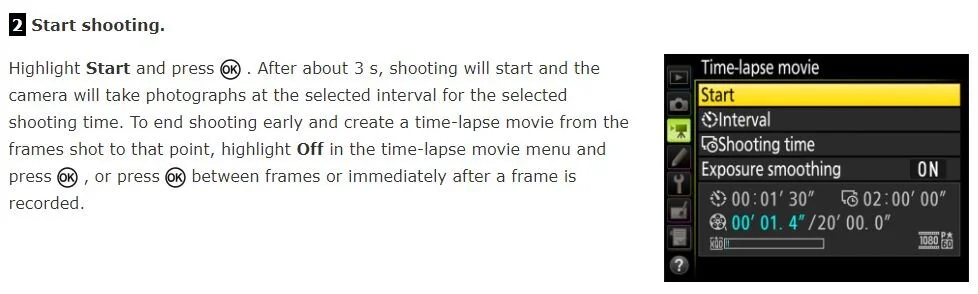
The below walkthrough is from the Nikon website.

Next, we will take a look at the types of Lenses available and what type of photography is best suited for a specific Lens type.