Shooting modes
Camera dials
Modern cameras have many shooting modes and each of these can be used to assist in different situations. These shooting mode settings are on the camera mode dial that you can see pictured below. The most common modes are Programmed, Aperture, Shutter Speed, Manual, and Auto. To select any of these modes you simply select it on your dial and your digital display should show you the first letter to denote the shooting mode you are in. Also, on the camera dial, you can control whether you wish to single, continuous low, continuous high, or mirror up. We will look at these at the end of the topic. There are more settings, and these vary from one make of camera to the next, however, we will first look into the 5 main shooting mode settings which will cover everything you need for now.
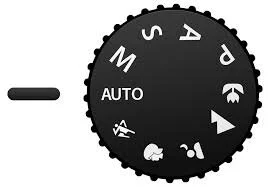

Left: Example of camera dials. As you can see some c camera mode dials will have all shooting modes options spread out with the first letter denoting the mode, whereas other will condense them under a mode button to allow other settings to be put on the camera dial.
Manual Mode/Bulb Mode
Manual mode gives you full control of Aperture, Shutter speed, and ISO. It is important to note that manual mode will not compensate or attempt to do anything to the aperture, shutter speed, ISO, or exposure on your behalf. This is a good thing to keep in mind because you can now deliberately under and over-expose photos, cause motion blur, create a light painting, or anything else you can dream of. To select Manual mode on most cameras you turn the camera dial mode to M, or alternatively, consult your camera book. Most photographers starting out will not touch Manual mode and that is generally a good idea, I would advise using auto, aperture, or speed priority until you start to understand how the settings change the exposure and you are confident changing them quickly.
Bulb mode is the same as a manual mode with one difference, it can capture longer than 30-second exposures. This mode will need a remote shutter release cable to negate any camera shake. For some remote camera shutters release cables, you will need to hold the button down for quite some time, then release it when you are happy with the length of time. Some do have a lock button so you do not need to hold it down, which is very convenient during a long night out shooting. Others, that are more advanced allow setting delay timer, exposure times, intervals, and how many photos to shoot which is very handy for time-lapse. These settings of course can be changed and managed in the camera, but it’s much easier with a remote shutter release cable, especially one that enables most of the functionality.
Once you grasp exposure and how to manipulate with manual mode then you can create the effects you want for any type of photography you wish to capture. Manual photography is particularly popular for Landscape and Astro-photography. Let us look at a few photos that you would normally struggle to capture if you didn’t use Manual mode to deliberately cause an effect or see hidden detail.

The moon requires deliberate under-exposing when photographing because it reflects back 12% of all light. I advise a good point to start photographing the moon is 1/100 sec at f/8.0 with an ISO 100. Dependent on the moon phase (how much of the moon is showing) you can change the shutter speed to compensate for exposure. Remember to use a Tripod!

Car light trails are created with long exposure photography whilst using Manual mode with a tripod and remote shutter release cable. This photo was a 20-sec exposure set to infinity.

This image isn’t a long exposure and it wasn’t a dark day. This was approx 1 half hours before sunset and my lens had a neutral density filter on it (we will talk about these later) which blocks x amount of light-dependent on the strength of the filter. I used 1/250 sec f/8.0 with ISO 160.
Shutter Priority
To use shutter priority Select S on the dial mode, or on the mode button if you have one.
Shutter Priority mode is used when you know you require a specific shutter speed and do not care about the depth of field. If you set your camera setting to use auto ISO you will then have one less thing to worry about. When the conditions are right shutter priority will do the job well but be warned, if the conditions become too bright or too dark then the aperture may not be able to achieve a small/large enough f/stop to compensate and your photo may become under/overexposed.
Aperture priority
Aperture priority is selected by using A on the dial mode, or on the mode button if you have one.
Aperture priority mode is great for controlling the depth of field you require for a photo whilst also controlling the light gathering of the lens. If you set your camera set to auto ISO you will just need to concentrate on your depth of field and exposure. Aperture priority Aperture is a favourite for wedding and wildlife photographers because it allows them creative freedom to add blurry backgrounds and bokeh to their photos. Also, it is fast to use because you directly control all light gathering and if you have auto ISO enabled then all the better. Like shutter speed, it does have its limitation and can be affected in dark conditions where the shutter speed will go low and cause camera shake, although this can be countered with a tripod if you have one with you at that time. This is my preference for
Auto mode
Auto mode is selected by rotating your dial mode to Auto, or from the mode button if you have one.
Auto mode is a good place to start if you have your first DSLR, it will help you to learn things gradually. Modern cameras auto mode does a good job if you are looking to get quick snaps and for general usage. It isn’t foolproof and will get things wrong but on the whole, it enables you to focus on just composition and getting your shot. It is worth studying photos you have taken with auto mode inside photo editing software, try to learn what aperture, shutter speed and ISO the camera chose before you reveal the true settings from the EXIF. I found it was good to try to assess how the photo was taken and to figure out what effects aperture and ISO made to a photo, I found shutter speed was very easy to understand.
Auto mode's main downside is its lack of versatility where you are locked out of changing settings and have no creative freedom. There will be moments when bright and dark will be either over or under-exposed because the camera will focus on trying to get the entire photo exposed center of exposure metering. For example, if you are taking an image of a sunset with beautiful yellow, orange, and red colours the camera completes its calculations and wants everything to be exposed dead center of the exposure meter, and by doing that it ends up over-exposing a little and removing some of the beautiful colours in the sunset. It’s hard to explain, but by trying it yourself you will see the result. Don’t be put off by using auto mode though, you just need to learn auto mode limitations during your photography trips.
Camera Drive Modes

Nikon D500 Camera drive modes S, CL, CH, Q, QC, Delay, M-UP
Most DSLR cameras will have the ability to set your camera to shoot just once or multiple times when you press the shutter release and hold it down. Below is a list of the modes you may find on a camera with a brief explanation.
S = Single-shot mode will take one photo even if you keep your finger pressed on the shutter release. Useful if you do not want to take too many photos and preserve memory card space.
Continuous / Burst = When the shutter release is pressed the camera will fire multiple shots. If you continue to hold the press the shutter release it will continue shooting up to the camera max fps (frames-per-second), however, the memory card also has to be considered in this factor because a poor card will cause a further buffering delay (the effect of lag before allowing further photos to be stored restricting shooting response). Continuous modes can come in two types, Low and High. These modes are extremely beneficial when the subject(s) are fast-moving and they will give you the best chance of getting your shot. Let’s have a look at the small differences.
CL = Continuous Low will take continuous photos at a slower rate than your camera can achieve compared to continuous High. This is much more effective than a single shot and with the slower continuous fps, it can give some motion variation to your imagery.
CH = Continuous High allows the full fps that your camera can achieve. Highly effective if you are shooting wildlife, fast vehicles, and anything else that requires quick reactions. If you plan to shoot in this mode often, it is advisable to get a memory card with fast transfer speeds and plenty of storage capacity. We will learn about memory cards later on.
Q = Quiet mode is for the moments you do not want to disturb your subject. This can sometimes be handy for wildlife photography.
QC = Quiet Continuous as above but with a burst, chances are with the burst you will disturb your subject regardless of the shutter door being quieter.
Self-timer = Adds a delay of x amount of seconds from the moment the shutter release has been pressed, before a photo will be taken This is useful if you do not have a remote shutter release, setting the camera to a 5-second delay allows time for any vibrations to stop before a photo is taken. Also, you can set a longer timer to enable yourself to join friends for a group photo.
Mirror Lock-up = This will lock up the shutter door, it will lessen any vibration in your photo making it potentially sharper. This is particularly useful in Landscape or stationary subject(s).
Now you have a basic understanding of the shooting modes, it is time to move on and take a look at the different types of focusing modes that can be used and when to use them.
Press next below when ready to move on.