Exposure Control

The two main settings to control exposure are Shutter speed, and Aperture. ISO plays its part in exposure, but unlike the previous two, it does not restrict or collect light. ISO is used to brighten or darken an image, we will look at ISO later in this topic. Above is the widely used and known Exposure triangle for photography. The exposure triangle shows the effects of using each of the three settings for controlling exposure, and the relevant values that cause it. Firstly, let us take a look at light gathering.
Light Gathering
When you press the shutter-release button to capture an image, a signal is sent to the camera shutter door to open and shut for a specific period. This may be automatically set by the camera, or set by the user manually. During this period, the light will be able to reach the sensor for the camera to render an image. However, before the light can reach the shutter it will need to travel through the diaphragm within the lens. The amount of light allowed through the lens is also controlled by a value known as aperture. It is important, however, to not just think of Aperture as solely a measurement of how much light travels through the lens, because there is also another function to aperture. Aperture also controls the depth of field and can generate, if used correctly, some lovely effects in photos such as smooth backgrounds, or bokeh behind your subject of focus (more on the depth of field control further on in this topic).
An extremely important factor when trying to gather light is to consider the location and conditions that you are planning to shoot in. If you are shooting in a controlled environment, such as a photography studio, you can set up your lighting and configure your camera settings just once and then not worry about them. However, if you are outdoors you will need to constantly be aware of your surroundings. Certain objects or structures can block or even reflect light, these can potentially ruin your photos, the same can be said about changing weather conditions.
Aperture
Aperture is the diameter of the f/stop (hole or diaphragm) inside the lens which can be controlled to allow more or less light through to the camera. These f/stops have measurements such as f/1.4, f/2.0, f/2.8, and so on. The smaller the f-stop number, the wider the diaphragm opens inside the lens. If someone says to use a larger aperture or to shoot wide-open, they mean to use your smallest f/stop, this then opens your lens diaphragm fully. The wider the hole, the more light can be let through to the camera. Needless to say, the higher numbered f/stops make the diameter of the hole smaller which in turn restricts the light’s ability to reach the camera. The amount of light that passes through your lens will dictate how fast a shutter speed you can achieve that will still produce a well-exposed photo. If you do not use a smaller f/stop (f/2.0), with a fast shutter speed such as 1/4000 your photo will risk being under-exposed (dark). Likewise, if you use a smaller f/stop (f/2.0) with a slower shutter speed then it will be over-exposed (light) due to too much light hitting the sensor. You can now start to see that using these two settings will be an eternal battle to achieve your desired exposure, to make matters more interesting changing weather conditions will affect the exposure.
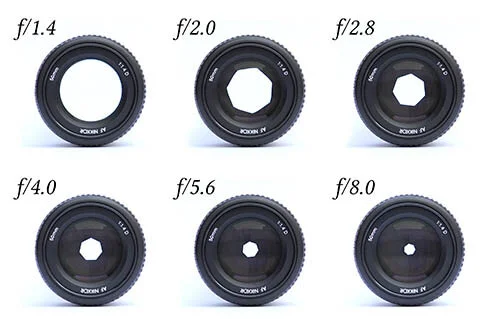
Left: Examples of different apertures f/stop showing how wide or narrow the diaphragm can be in the lens. It can be confusing for a while trying to understand that a smaller aperture (Closing down) such as f/16 lets in less light, and the larger aperture (opening up) such as f/1.4 lets in more light. Apertures generally range between f/1.4 up to f/32.
Scenario example: Night photography can be particularly challenging, especially Astro-photography. If you wanted to capture the stars in the sky you would shoot “wide open”, or in other words adjust your aperture to as large as your lens can use, such as f/1.4, if it allows. If you use a smaller aperture like f/11 or upwards, your camera will have a hard time rendering all the content you are trying to capture due to a lack of light.
Aperture and Depth of field
Now is the time to speak of apertures role in depth of field. The f/stop values achieve varying depths of the field before and after the subject of focus. Smaller f/stops (f/1.4, f/2.0..) have less depth of field therefore anything that is beyond the subject of focus will appear smooth or blurred. Another pleasing effect that can occur when using lower f/stops and will require practice is something called “bokeh”. Bokeh is produced from out-of-focus points of light beyond the subject of focus. Bokeh can appear perfectly round, somewhat misshapen circles or hexagonal shapes. The shape created is caused by the diaphragm within the lens. A Lens that has more diaphragm blades often tends to produce more visually pleasing bokeh. A genre of photography that uses low f/stops often is portrait photography, this is because it separates and makes the model clearer from the background helping to keep the viewers focused on the subject. Also, it is very popular with wildlife and nature photography because it helps to gather enough light to enable higher shutter speeds for fast-moving subjects such as birds or animals. Also, it separates and makes the subject clearer from the background. Take a look at some examples of low f/stop photos I have taken in the past, hopefully, the pictures will say more about what I am trying to explain.

Aperture: f/5.6

Aperture: f/4.0

Aperture: f/3.5
So how about larger f/stops, I hear you say? Using larger f/stops (f/11, f/16..), are very popular for landscape photography. These will show a greater depth of field and produce a sharper background from the subject of focus. If there is some foreground in front of the subject of focus, this potentially will be as sharp as the background. Some lenses offer an aperture setting known as infinity, this will be marked on the lens aperture ring as an infinity symbol. When you find the exact location of infinity, which can sometimes be a little before or after the symbol on the aperture ring, you will generally not have to worry about focusing on a subject. This is because everything should be in focus within your lens field of view. However, always check your photo’s when using this aperture setting in case the aperture ring moves or you do not get the exact point on the focus ring. One trick is to use some tape or a wristband designed for specific lens sizes to keep focus/aperture rings in place.
Again, I have added some photos that I have taken to show why larger f/stops are so popular for landscape photography.

Aperture: f/22

Aperture: f/13

Aperture: f/11
Shutter speed
Shutter speed is a measurement of the time it takes for the shutter door to open and shut and is measured in fractions of a second.
If your shutter speed is set too slow for a moving subject, your subject in your photo will display motion blur. If you wish to freeze your moving subject in time, with no motion blur, then increasing your shutter speed will achieve this. When mastering shutter speed it can produce striking photos. Deliberately setting slow shutter speed, on waterfalls, will create water that has a sense of motion whilst appearing milky or misty. It is important to remember that using high shutter speeds such as 1/1000 upwards will require a significant amount of light to be gathered by the lens to stop the photo from being under-exposed. Using a smaller f/stop or raising ISO will help to maintain correct exposure when using high shutter speeds.
When using slow shutter speeds it is a very good idea to use a tripod and a remote shutter release cable. The extra stability will increase the chances of getting a sharper image. A tripod is necessary if you are planning to capture long exposures, these require zero vibrations/camera shake to achieve a sharp photo. If you can, purchase a remote shutter release cable because this will be very useful for long exposures, although you can set a timer in your camera to delay taking a photo by x amount of time when you press the shutter release button on your camera.
Shutter speed/Focal length rule
In photography, there is a shutter speed/focal length rule that is very useful to remember when starting out. When shooting handheld it is highly advised to not use a shutter speed that is lower than the current focal length setting of your lens unless you are using a tripod. For example; If I am hand holding my camera and using a 50mm zoom lens at a setting of 25mm and capture a stationary subject with a shutter speed of 1/50 I can expect with good technique to get a clear photo because my shutter speed (1/50) is greater than my zoom lens setting (25mm). If you were to reverse the numbers to a shutter speed of 1/25 at a focal length setting of 50mm then there is a chance you will see motion blur due to camera shake. The longer the focal length the more chance camera shake will occur. Although it is possible to get away with shooting with a slower shutter speed, than your focal lens setting it is not advisable because of the risk factor. With that said, in time and with experience your technique will improve and you will become more adept at finding ways to overcome slower shutter speeds.

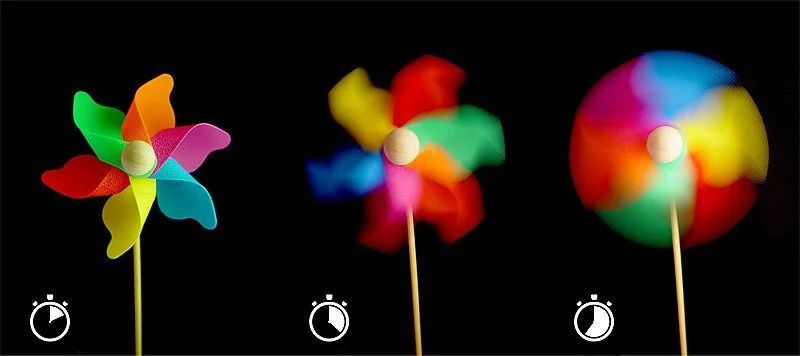
Above: Examples of the effects that shutter speed control can have on a moving subject such as a running man. You can see the slower shutter speeds (lower fractions) become predominantly more blurred due to motion. There are situations where the blurred effect may be exactly what you are looking for so keep this in mind.
Below: If you reference the shutter speeds of the running man image, you can guesstimate the potential shutter speed that may have been used to achieve the windmill photos. The shutter speeds used for shooting the running man may need to be tweaked a little for the windmills, and for other subjects for that matter. You will need to take into account the speed of each subject. Also, distance needs to be considered, especially nearer subjects which induce more motion blur. Through trial, error and experience you will start to achieve what you desire.
Below: Examples of photos which I have taken using different shutter speeds. All of the subjects are fast-moving. You can see how the faster shutter speeds freeze time. The slower shutter speeds show the sense of motion of the vehicles and have created light trails as an added effect.

Shutter Speed: 1/2000

Shutter Speed: 1/1600
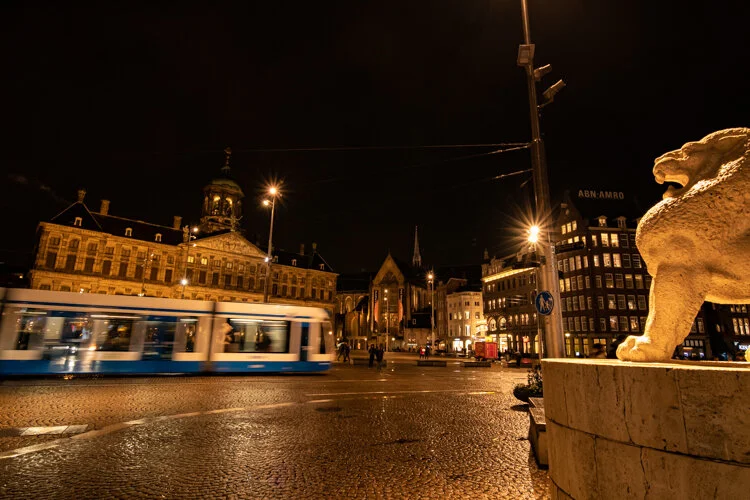
Shutter Speed: 1/13

Shutter Speed: 20” (This is a 20 second exposure using a tripod)
ISO
You can use ISO to simply darken or lighten a photo. Each level of ISO adjustment doubles in brightness or darkness. This comes in very handy in difficult-to-shoot situations, especially in dark environments, or for when you want to try to achieve a higher shutter speed because the photo is blurry. Sounds too easy? Too good to be true? Just as eating too much cake will have repercussions on your waistline, raising the ISO level will have consequences on the quality of your photo. Each time you raise the ISO value, this will create noise and this is perceived as a “grainy” effect on the photo. The higher you raise the ISO the more noise is generated and the more the photo degenerates. Using ISO at higher values can be seen as a trade-off to achieve higher shutter speeds or lower f/stop values in an attempt to achieve the right exposure for a photo.
The photos below were all shot upon a tripod with a remote cable shutter release inside a living room with no assisted artificial lighting. The settings used were 1/100 sec at f/ 4.5 with a lens focal length of 73mm. You can see the effect ISO has on the photos, each time the ISO is adjusted one stop, it is doubling the brightness.


Below: When zooming into the images taken, you can start to see the grain affect becoming more prominent the higher the ISO value gets. The grain effect is more prominent on the green rune stone.

ISO 800

ISO 1600

ISO 3200

ISO 6400
Although grain effect is introduced when using high ISO, it is always best to capture that moment, even with the noise, than to not capture it at all. It is important to know that photo editing software can remove or decrease the noise from an image to make it more acceptable, so, therefore, make sure you take that photo!
Exposure Meter
Ultimately whilst changing any of the three settings you will be monitoring the exposure meter until you are happy with the exposure you are trying to achieve before you press the shutter release. For the majority of photos, you will take, you will be aiming to place the exposure meter dead centre so the photo is exposed correctly, however, there are going to be times you will want to over or under-expose on purpose. Auto mode which is one of the modes you can choose to shoot in (we will look into shooting modes next topic) will do all the exposure for you, however, it will always aim for the exposure to be dead centre and this can be a problem if you need to make your image darker because of too much glare. Again don’t worry about this too much, we will look at ways around these throughout future topics. Take a look at the image below, I have highlighted the areas that are related to the topic.

Image of my Nikon D500 camera display showing Exposure Metering, Shutter Speed, Aperture and ISO Values. The exposure metering is showing a little over-exposed, set to a 1-sec shutter speed at aperture f/5 with an ISO value of 250.
Quick Summary
Aperture control is used to allow more, or less light to travel down the lens depending on whether you are trying to achieve faster or slower shutter speeds. Aperture controls the depth of field and depending on which aperture you use, you can make a photo sharp almost throughout the entire image, or if desired you can blur everything from beyond your subject’s focal point with a beautiful smooth or bokeh background.
Shutter speed can also, to an extent, be used as a way to control the image's lightness and darkness although shutter speed’s primary function is to kill motion or give a sense of motion to a subject. The forthcoming explanation is assuming that the two shutter speeds are using the same aperture rating. Whenever a fast shutter speed is used, let us say for example 1/4000, the light will have only 4000th of a sec to pass through the shutter door as it opens and closes. The outcome of an image at 1/4000th would be much darker than a photo shot at shutter speed 1/50 this is because light has 50th of a sec to travel through to the sensor, therefore creating a lighter image. Be sure to invest and use a tripod preferably with a remote shutter release for slow-speed photography, otherwise, a camera shake will ruin your photos.
ISO can be used to lighten or darken an image and helps to achieve faster shutter speeds and larger f/stops (f/8 and upwards). There is, however, a trade-off effect to using higher ISO values. The higher the ISO rating, the more noise is generated, therefore the image will appear to contain grain and be less visually pleasing. There are times when shooting with high ISO is required because there is insufficient light available even at smaller f/stops.
Putting what you learned into practice
Taking a look again at the image I took in 2015 it was shot with a shutter speed of 1/200 at aperture f / 11 with an ISO of 100 at a focal length of 22mm.
The landscape contains no fast-moving subject/objects, so, with that in mind if you were to shoot this photo again, with correct exposure and similar weather conditions, and you wanted to preserve the depth of field as in the image, what would you do?
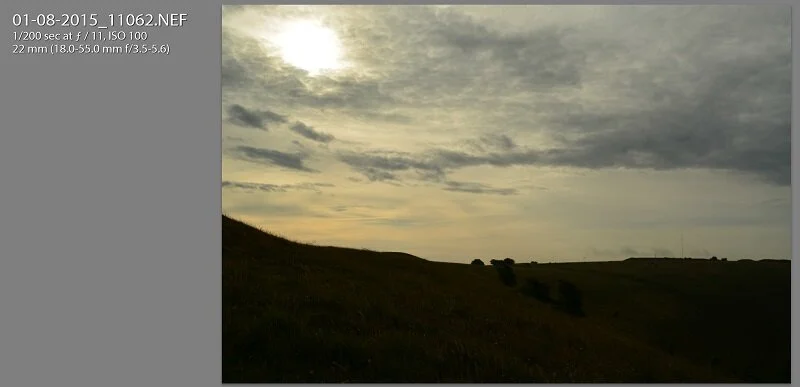
You could adjust the shutter speed down to 1/25 or 1/50 which would lighten the image. Another option is to adjust the ISO value from 100 to a higher value remembering each adjustment doubles the brightness of the photo. Because I mentioned preserving the depth of field, you would leave the aperture at f/11, otherwise, if this was tweaked too much it will affect the depth of field making it either wider or narrower.
By tweaking any of the three settings during your photography sessions, and re-taking the photo you can start to understand the impact it has on the image. Let’s go ahead and dive into the different shooting modes you can use on most DSLR cameras. Press next below to continue.