Focus Modes
Alongside light-gathering, focusing is an extremely important part of photography. An out-of-focus image is just going to be binned and sometimes you have but a few seconds to get that image you want, so learning which type of focus and focus point tracking system to use is imperative. When you look through the viewfinder you should see a little square that you use to target over your subject, this square is used as your focus point, also it ‘meters the exposure’. This focus point can be moved manually, or there can be multiple points that automatically track your subject, however, something that is important to remember is that the center focus point should be the most sensitive and accurate of them all. As you move outward from the center focus point the other focus points generally become less accurate, so with this in mind be vigilant when using a focus point too far away from the center on fast-moving subjects.
Focus Modes
The primary focus modes are Single, Continuous, Automatic, and Manual.
Single Focus
Known as AF-S on Nikon and Pentax, and One-shot AF on Canon, Single Focus is best used on stationary targets. Simply get your subject in your focus point and half-press the shutter release button (or AF button - more on this later) until the subject is in focus, once focus has been obtained fully press down the shutter release button to capture the photo.
Continuous Focus
On the Nikon and Pentax, this is known as AF-C whereas the Canon is known as Al Servo AF. These modes are useful for moving subject(s) and will give you the best chance to maintain focus and to get that photo. To use Continuous focus set your camera to AF-C / Al Servo AF and half-press the shutter release button (or AF button - more on this later) until your subject is in focus, continue half-pressing the shutter release button (or AF) whilst panning with your subject, press down fully on the shutter release button when you are happy with your composition. This mode will use more battery than Single Focus mode due to constantly calculating the subjects speed, distance, etc.., however, it is best to use more battery than to have more photos to throw away at the end of the day.
Automatic Focus
AF-A (Nikon) or AI Focus AF (Canon) is the Automatic Focus mode where the camera selects between Single and Continuous modes automatically by calculating the movement of the subject. If the subject is stationary or moving very slow then the camera will use AF-S / One-shot AF and if the subject moves faster, or erratically it will select AF-C / Al Servo AF.
This mode may not be available on high-end cameras because it is generally designed for photographers that are new to photography.
Manual Focus
Manual focus is when you use your hand on the focusing ring of the lens to achieve focus. It can be frustrating and will take practice, especially on moving subjects such as insects, however, if you nail the sharpness on one of these shots it will look amazing. It is important to note there are Lenses that only have a manual focus mode, so spending time to practice is advised. If the subject is stationary I tend to use Manual, it removes the potential of Automatic focus not getting the image pin-sharp, of course, there is an element of human error. Manual Focus is extremely useful if Automatic Focus is having trouble focusing due to background/foreground contrasting issues (more on this later).
Auto Focus(AF) Area modes
AF Area modes are specifically available to offer different ways of tracking subjects in different conditions. There are a number of these area modes and consideration should be taken if you know the type of subject you will photograph. Be aware the AF Area Mode pictured below is from my Nikon D500 and will vary from one camera to the next. Let’s take a look at these below.
Single-Point AF
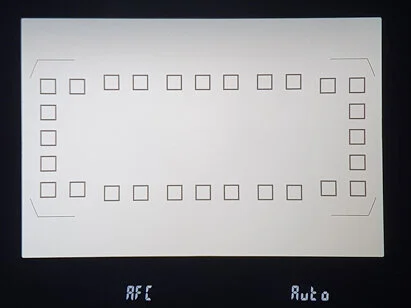
Best used on a static subject with good light conditions this mode ensures the subject is sharply focused. Below are a number of images showing AF S and the type of Area Mode activated which can be seen in the camera viewfinder.
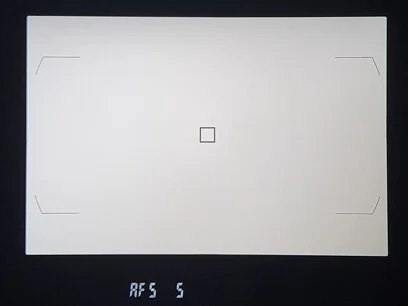
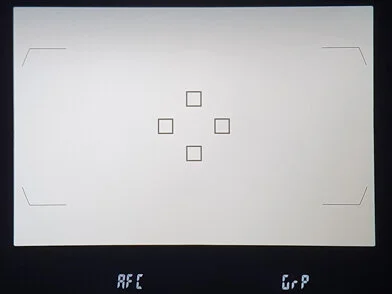
AF-S Single Point AF - The small box will be the focus point
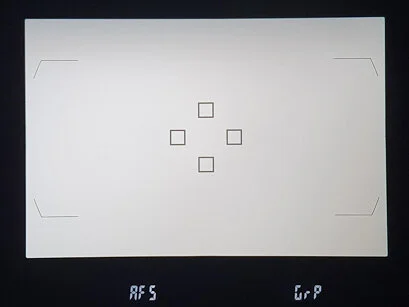
AF-S GrP AF- Subject on the small boxes or the single point AF will be the point of focus.
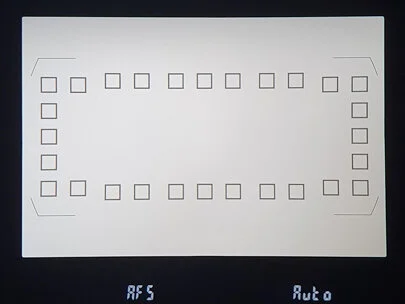
AF-S Auto AF - The camera will automatically select the focus point. Priority is given to face(s) of subjects detected.
Dynamic Area AF
Depending on the camera type you can select from a number of focus points that are designed for specific scenarios. My current wildlife camera is a Nikon D500 and it has Dynamic Area AF options - Single point, 25, 72, 153, 3D, Group, and Auto-Area AF points. There are fewer options on lower-end models and potentially more on higher-end models.
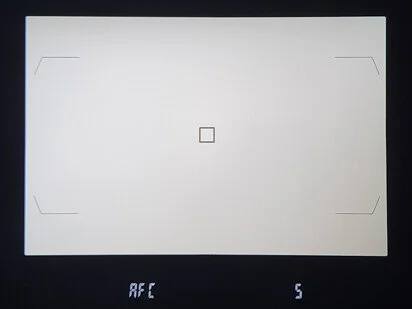
AF-C Single Point AF - The small box will be the focus point
AF-C GrP AF - Subject(s) within the group of small boxes will be point of focus. Select when focusing on erratically moving subjects such as birds.
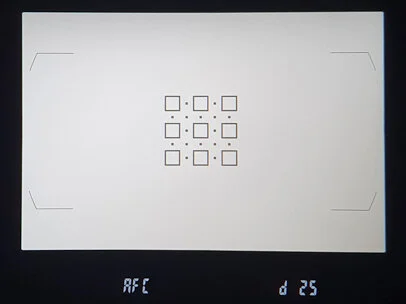
AF-C 25 Point AF
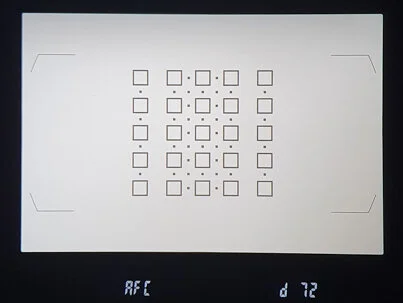
AF-C 72 Point AF

AF-C 153 Point AF
Above: Choose AF-C 25, 72, and 153 for low-contrast subjects (background/foreground contrasting issues) if the camera has difficulty focusing or for active subjects that are hard to keep framed in a single point, and increase the number of points if the subject is moving unpredictably or occupies a large area of the frame. Choose a setting one level higher for subjects at the edge of the frame.
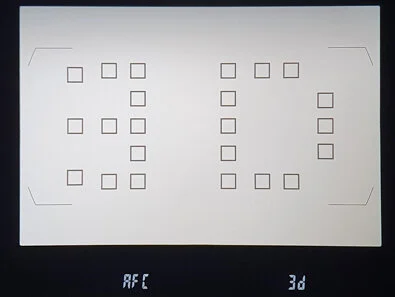
AF- C 3d Tracking AF - While the shutter-release button is pressed halway, the camera uses colour information to track subject(s) that leave the selected focus point and selects new focus points as required.
AF-C Auto AF - The camera will automatically select the focus point. Priority is given to face(s) of subjects detected.
To select these options on your camera it is best to consult your manual as it will differ from one camera model to the next, or alternatively search for the “camera type AF-area modes” on a web search engine and you should find the information required.
Common Focusing problems
We have all had this problem and will always have focusing issues at some point, what is important is understanding what caused the issue and the best way to avoid or rectify it from happening so often. I have formatted a list below of some of the potential focusing problems that can occur.
Poor Technique - When photographing ensure your elbows are tucked into your body, or as near as possible, avoid sticking your elbows sideways or in front of your body because your arms will have no support and will become tired and shake. Try to balance the camera and lens perfectly in two hands, the kit should not feel like it will tilt either side if you were to lightly balance it in your hands. Focus on trying to keep your breathing slow and steady as if meditating, deep breaths can affect your chest and stomach movement and lead to arm movement causing camera shake.
Contrast issues foreground/background - Use center focus point or change AF tracking system with 25+ points to assist in separating the subject from the background. Alternatively, you can try Manually focusing if the subject is stationary, slow-moving, or if moving left to right. Manually focusing on a subject that is moving towards you or away from you is very difficult and will require lots of practice.
Wrong AF mode for the job - Try to use AF-S for single subject targeting, as for erratic subjects use AF-C with a wider Area Mode allowing for more focus points to increase chances of focusing.
Heat refraction / Light dispersion / Air turbulence - Heat refraction, light dispersion, and Air turbulence can make images look blurry, this is a fairly common cause when using a longer focal length lens such as Telephoto Lens. Weather conditions can be a real difference between shooting a sharp image, and a not so sharp image, especially when shooting low down targets where heat waves can be easily seen and blur images. Light dispersion is caused when a subject such as a moon is low in the atmosphere (just rising) it will be mostly blurred regardless of how hard you try to focus. Air Turbulence is generally a concern for Astronomers and Astro-photographers, however, it also has effects on Sunrise, Sunset, and Moon Rise images due to changing temperatures and position of the celestial bodies being low in the atmosphere.
Dirty AF Sensors - It is not uncommon for the dust to get inside the camera, even weathered sealed ones, because at some point you will need to remove the lens, and even when removing the lens indoors there are still going to be dust particles that will enter through the opening of the camera lens mount. If too much dust enters over time it can sit on the sensors and cause blurry, grainy, or splodge artifacts on your images. In most instances, all you need is a simple air blower to remove the dust by holding the camera face down and blowing the air into the open camera mount for the dust to fall out. Also, you can use the camera’s inbuilt camera sensor cleaner which will clean the sensor if dust reaches it, this can be set to run every time your camera is turned on, which is useful. Also, keep your lens cleaned at both ends to ensure it stays dust-free. If all the above has been tried, and the problem is still occurring then you can take it to a reputable camera shop to clean it for you.
Dirty Lens Contacts - The Lens is attached to the Camera Lens mount by turning and locking in place, part of the lens that attaches is known as the Lens contacts, and these relay information to the camera from the lens and vice versa. If these contacts become dirty then communication issues can occur which can lead to poor photos.
Lens Calibrated incorrectly - Some Lens can become un-calibrated over time due to banging the lens, or even directly from the store. Thankfully this isn’t as complicated as it sounds to troubleshoot, but it can take a while to understand that this is the cause of failing to get the correct focus. Whenever you focus on a subject and assuming you have the right exposure, you should more than not gain a sharp image. If your images often appear focused beyond (back focus), or in front (front focus) of the subject you are intending to focus on, then this is likely due to the Lens becoming un-calibrated. Below is a chart that has been used to see whether a camera has focusing issues, as you can see from this example the lens is back-focusing between 2 mm and 6 mm, to be exact 4 mm.

You don’t necessarily need to use something as above, you can use anything that has a depth of field in front and beyond the subject, you are using to focus on. An example I once used was with 9 AA batteries, these were separated apart from each other equally, in a staggered line so they were all viewable through the viewfinder, I then focused on the middle battery so I could figure out if there was back or front focusing. I deliberately changed the settings a lot to see the effect it was having. So how do you adjust the lens calibration settings on the camera I hear you say?
Nikon example:
Press the menu on the back of the camera
Use the arrows to scroll to Setup Menu (Wrench icon)
Scroll to AF-Fine Tune
AF-Fine Tune (Turn on/Off) select On
Saved Value - Adjust to the value you want to try + or - and press OK.
Take a photo with the value you have selected and check whether the focus point has become more back-focused or front-focused. If the test has made the focus worse, then repeat the process and select the opposite value you tried previously, therefore if you chose a +3 then try a -3 and re-take your photo. Keep adjusting your settings, until you are happy the focus is now sharp on the subject point you have chosen. The setting will be saved in the Camera’s memory for that specific lens you just calibrated, if you had similar problems with another lens you can perform the process and it will be saved for that lens.
Now you have an understanding of Exposure and Shooting modes let’s take a look at Metering by pressing next below.